

If you are athlete or sportsman; then safeguarding yourself is of great significance. Likewise, the necessity and use of a mouthguard has become crucial. A proper fitted mouthguard ensures your teeth and jaw to remain intact and also diminishes the risk of injuries during the play.
In this article, we will be sharing the art of molding a mouthguard if that needs a custom size fit. Here you will find everything about the uses of a mouthguard including the step by step instructions to follow for your fitting and maximum protection.
Table of Contents
- What is a mouthguard?
- Why is it necessary to mold a mouthguard?
- What are the different types of mouthguards?
- How to mold a mouthguard at home?
- Easy ways to fit your mouthguard
- Storing tips after molding a mouthguard
- Conclusion
- Frequently Asked Questions
- How long do you boil a mouthguard to mold it?
- How often should you replace your mouthguard with a new one?
- How to clean the mouthguard after every usage?
- How to choose the best mouthguards?
- How do you mold a mouthguard without hot water?
- How do you fit a mouthguard with boiling water?
- Do you need to boil the mouthguard?
- How do you mold a mouthguard at home?
- Can you remold a mouthguard?
What is a mouthguard?
A mouthguard is a safety equipment widely used by sportsmen all around the world. This type of dental appliance is primarily used to protect the inner parts of the mouth, i.e. tongue, teeth, gums, etc. from severe injury.

It is a type of covering that fits well to your teeth. And as per the size of the mouth, it is usually boiled to bend or mold in order to provide the best fit and comfort. Either you can custom made a mouthguard or can buy directly from the store, at the end of the day, it all depends on what you want.
Why is it necessary to mold a mouthguard?
Mouthguard are essential teeth applicants that need to be fitted accurately as per the fit of your teeth. Since they serve the essential purpose of safety, therefore, they need to be accurately secured at a place, where they can serve their purpose and do not come off at any impromptu moments ridiculing you in front of many. Besides, a lopsided mouthguard will adversely affect your breathing and talking while risking the safety of your jawline.
In the same way, significance of wearing the shin guards during the play has been highlighted in another article titled ‘How to Wear Shin Guards’.
What are the different types of mouthguards?
There are three types of mouthguards currently available in the market. Pictures of the known mouthguards have been provided below for the quick view.
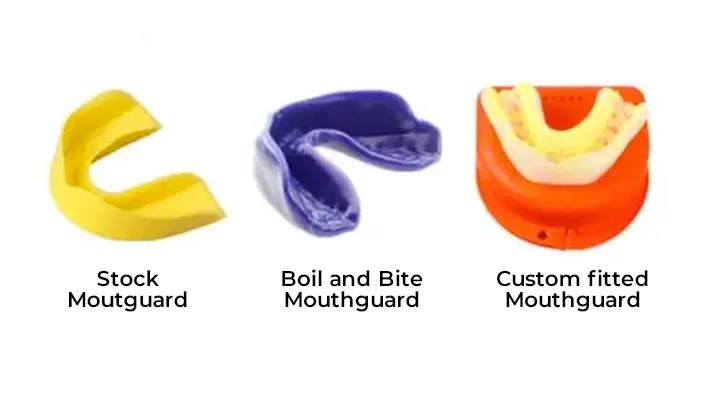
Stock mouth protectors
The most inexpensive ones are stock mouth protectors. These gum shields are performed and can be easily found in local sports shops, or departmental stores. It is very inconvenient for anyone to mold this type of mouthguard to a custom shape, which is why dentists discourage its use. They’re not only bulky but will also obstruct the way you breathe or talk.
Boil and bite mouthguards
If you’re looking for a better and more comfortable mouthguard, boil, and bite mouthguards are safe to say, the best bet. These are made of thermoplastic materials and offer a much better fit. Once they are placed in hot water, they can be pressed down via your fingers and tongue pressure to sit comfortably in between your teeth.
Custom-fitted mouth protectors
The custom-fitted mouth protectors are individually curated professional dental structures, drafted in a laboratory as per the instructions of your dentist. They do not need to be molded since your dentist will most likely take the impression of your teeth which is later used to mold a mouthguard in the laboratory by making use of a special material.
As this mouthguard requires extra time to curate, extra effort, and a precise quantity of products, it is the most expensive among all the three types yet is the most comfortable one and can resist unwanted hits.
How to mold a mouthguard at home?
It’s easier than ever to mold a mouthguard at home, thanks to the tips we have enlisted in this article. We’ve also comprehended for you in detail the step-by-step guide on how to increase its effectiveness.
Step 1: Place the store-bought mouthguard in your mouth
If you have already invested in a store-bought mouthguard you shouldn’t worry about your money going to the waste bin as we will carefully teach you how you can mold the store-bought mouthguard as per your mouth fit.
Place the mouthguard in your mouth to test the fit. Let it sit for a while to measure its approximations. Press it against your cheeks with your fingers. If it doesn’t sit well or you can feel its edges at the back of your mouth you can try altering its length.
- If the guard is softer and you think biting will just work fine, bite on the guard to know where your teeth sit on the guard.
- Later on, you can make use of a pair of scissors to cut down to a relatable length.
Step 2: Ensure to trim only ⁄2 centimeter (0.20 in)
When you are planning to trim the length of the mouthguard with a pair of scissors, strictly measure 1⁄2 centimeter (0.20 in) from the end. Once measured, reaffirm again after placing it in your mouth that the desired length is exact.
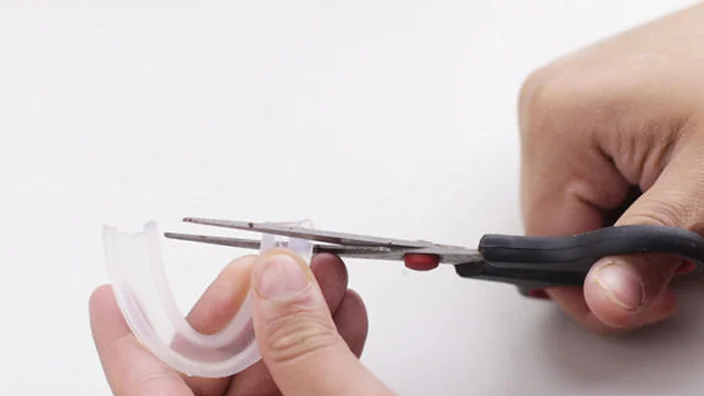
Carefully cut from the two ends, always make sure to cut at an angle to mirror the tapering at each end.
- After you have bit the mouthguard, you can easily figure out the impression of your teeth. Follow the impression and carefully omit the ends which didn’t show any teeth imprints.
- Please be mindful, a perfect mouthguard should have an optimal length covering your second molars. If the length exceeds, the mouthguard won’t function normally and would most likely make you look funnier.
Easy ways to fit your mouthguard
Once you are done with the trimming part, let’s dig into the process of fitting the mouthguard.
1. Let the water boil in a medium-sized pot
You need to take a small pot, fill it with 10 centimeters (3.9 in) of water and let the water boil. Stop the stove beforehand to prevent the water from boiling excessively.
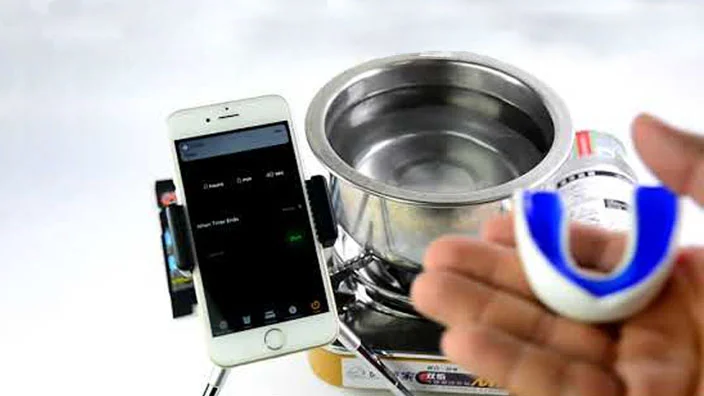
A microwave also functions the same way, in case, you do not have access to a stovetop. While making use of a microwave, please ensure to proceed with a microwave-safe bowl and only heat the water for 4 to 5 minutes.
2. Submerge the guard to mold a mouthguard
Fully submerge the guard in the heated water. A slotted spoon or any other utensil of similar structure would work best to lower the mouthguard. Beware, the mouthguard should not touch the sides of the pot or the bowl, whichever you are using, you will only need to lower it down.
Moreover, you can always hold the mouthguard from the strap to prevent it from touching the ground, unless it is to be used to play football or any other similar sport. Always read the instructions in the manual as instructions tend to vary from brand to brand. Some require 30 seconds of boiling, while others may differ in boiling period.
3. Let the mouthguard cool
Carefully, lift the mouthguard from the hot water, place it on a tidy towel, and let it cool for 20 seconds. Thoroughly dry the edges of the guard.
- Do not unnecessarily move the mouthguard as too many movements might mold it much.
- If in case, the mouthguard is too hot to touch, you can always place it in cool water for 1 second to remove off unnecessary heat.
4. Again, place it in your mouth
Place this warm mouthguard in your mouth, you only have 30 seconds to mold its shape as per your fit otherwise it will become excessively cool, consequently not retaining the form.
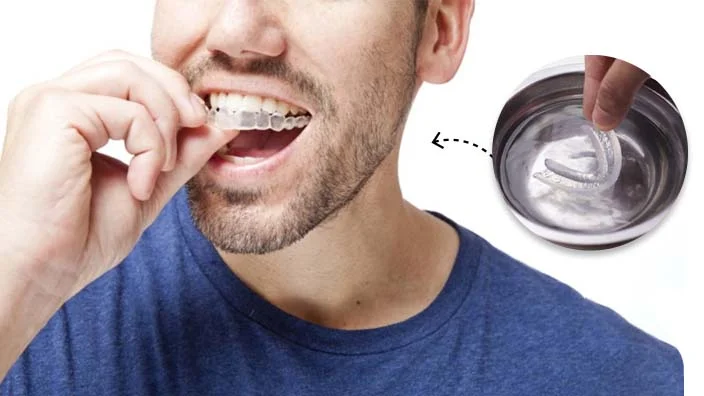
While fixing the mouthguard repeatedly keep in consideration the following essential points: -
- Press the mouthguard against the cheeks by exerting pressure with your fingers, alternatively, you can do this with your tongue.
- Even if the mouthguard doesn’t necessarily fit perfectly, you don’t have to worry at all. At this point, it should only sit comfortably in your mouth without discomforting at the least.
5. To furnish an ideal fit, such excess water
As you are placing the guard in your mouth, against your cheeks and tongue, continue with a sucking motion or as if you’re chewing. In this manner, the excess water will be sucked out and the mouthguard will grip your teeth more firmly, leading to an ideal fit.
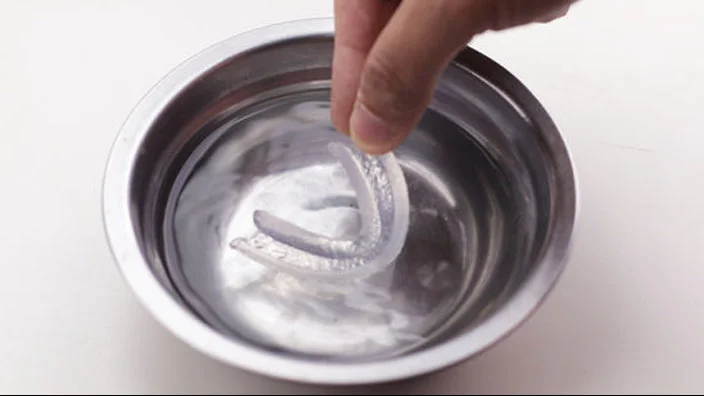
6. Place it in cold and tidy water
After the guard has secured an ideal fit, place it for some time in cold yet clean water to further set its molded shape. If for instance, the molded mouthguard isn’t quite right and still does not sit comfortably, you can always repeat the boiling and molding process like a pro.
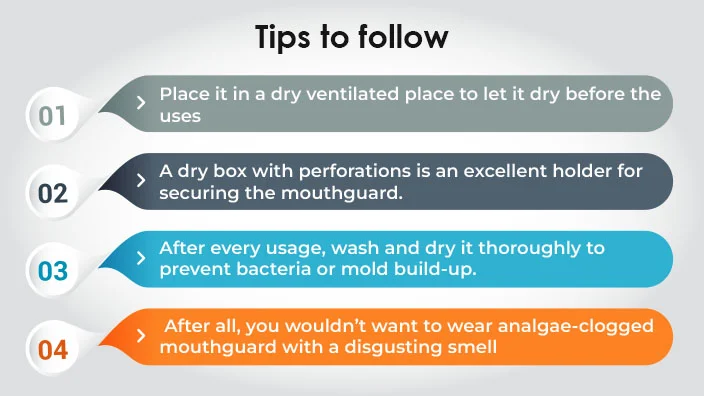
Storing tips after molding a mouthguard
Once your mouthguard is ready to use; then you need to follow few guidelines to keep the mouthguard best for the use in the time to come.
Conclusion
As we wind up our conclusive yet detailed blog, we are sure we have helped you in deducing a tailored fit mouthguard with simpler DIY tricks on how to mold a mouthguard. The process requires easy-to-grab ingredients, such as water, a towel, a stove, a pot, a pair of scissors, a microwave, and a mouthguard.
No athlete should ever compromise his safety. Always stick to thorough safety measures before you venture into the respective sports. Be mindful, if your body parts are damaged they can never be replaced. Therefore, we have made an effort to apprise you about the significance of the mouthguard and also the stepwise procedure to mold it to fit for you.
Frequently Asked Questions
How long do you boil a mouthguard to mold it?
Use a pot to fully submerge the mouthguard in it. Fill the pot with hot water, and allow the mouthguard to mold in the boiling area for 20 seconds only. If after, the molded mouthguard does not sit accurately as per the fit of your mouth, you may repeat the process of submerging the guard in the boiling water for another 20 seconds.
How often should you replace your mouthguard with a new one?
To ensure you have the best protection, you MUST replace your mouthguard with a new one, once every year.
How to clean the mouthguard after every usage?
Hot water is the best natural antiseptic killer. After every usage, wash it thoroughly with warm water. Warm tap water works fine you don’t have to work for boiling the water for this purpose.
How to choose the best mouthguards?
The best mouthguards are the ones that can endure the hardest hits, last longer, can be molded with ease once submerged in water, and provide the necessary comfort when in case of jaw-breaking punches.
How do you mold a mouthguard without hot water?
Yes, you can mold specific mouthguards without hot water. However, you may need a microwave for that purpose.You can either soak the mouthguard in cold water. Let it cool for a while. Once cooled, place it in your mouth and you will drastically see the guard fitting snuggly the lengths of your mouth.
How do you fit a mouthguard with boiling water?
Place the moth shield or mouthguard in the boiling water for a period of a few seconds. Remove the mouthguard as soon as the stopwatch beeps! Position it in between your teeth, and bite it to secure a mark on the guard. In doing so, ensure to push it against your cheeks, around your gums, and at the back of your teeth to help secure its firm position.
Do you need to boil the mouthguard?
The easiest way to mold a store-bought mouthguard is to boil it in a pot on a heat-regulating stove. As soon as the plastic softens, the guard is ready to be shaped as per the fit of your mouth.
How do you mold a mouthguard at home?
Start with boiling water, and immerse there mouthguard for 30 seconds. Then remove to cool that for a while before biting down on softened guards, press that against the teeth. Follow the instructions for the best results to find out secure and customized fit.
Can you remold a mouthguard?
Once the molding has been done to a mouthguard. Can it be remolded or repeated. Yes, you can repeat the process to custom fit to you; and the process of remolding in case of mouthguard can work upto 15-20 times, before the replacement with the new one.